
airflow-chat: Conversational AI Built into Airflow
Talk to your DAGs, inspect tasks, and operate pipelines—right from the interface.

Introduction
Not long ago, we introduced our MCP for Airflow—designed to make operating DAGs and workflows as intuitive as chatting with a colleague. But there was a catch: it depended on Claude Desktop, which some organizations are unable or unwilling to adopt due to concerns around sharing data with Anthropic—or because of other operational, compliance, or policy-related reasons.
That got us thinking: what if we brought the same conversational interface directly into the Airflow UI?
That’s how the airflow-chat plugin came to life.
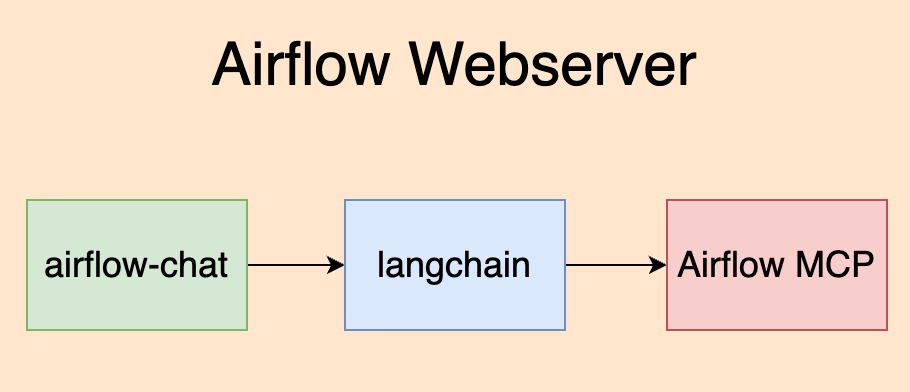
Under the hood, the plugin still leverages our existing MCP. You can run it fully embedded inside the Airflow webserver, or flexibly configure it in one of two other ways:
As a plugin running inside the Airflow webserver (simplest setup)
Using the plugin alongside a separate MCP service
Or in a fully decoupled three-process architecture: Airflow webserver plugin → FastAPI server → MCP service
You also have full control over the LLM backend. MCP supports multiple providers, so you can choose to run it with Amazon Bedrock, Anthropic, or OpenAI—whichever best suits your infrastructure and policies.
This makes it easier than ever to integrate natural language interfaces into your pipelines—entirely within your stack and control.
Explore the project here:
PyPI: airflow-chat
GitHub: airflow-mcp-plugins
Quickstart
If you don’t have your own Airflow cluster, feel free to use the one provided in our GitHub repository.
Let’s start with the simplest setup. To integrate our plugin, add the following to your Airflow environment:
airflow-chat==0.1.0a8Note: Version 0.1.0a8 is the latest at the time of writing. Check our PyPI repository for updates before installing.
🛠 Required Environment Variables
Add the following environment variables to your cluster configuration:
LLM_MODEL_ID=anthropic:claude-3-5-haiku-20241022
AIRFLOW_ASSISTENT_AI_CONN=airflow:airflow@http://localhost:8080
ANTHROPIC_API_KEY=your_anthropic_key
AIRFLOW_ASSISTENT_AI_CONN Explained
This connection string is used by the AI Assistant plugin to communicate with your Airflow instance. It follows this structure:
AIRFLOW_ASSISTENT_AI_CONN=<username>:<password>@http://localhost:8080Replace <username> and <password> with any valid Airflow credentials you want the assistant to use.
Do not change localhost:8080, as this address is required for internal routing within the containerized environment where the plugin operates.
🔁 Model Flexibility:
You can switch LLM_MODEL_ID to use models from Bedrock or OpenAI. Simply change the prefix accordingly:
For Bedrock: bedrock:...
For OpenAI: openai:...
Be sure to set the correct corresponding API credentials:
Anthropic: ANTHROPIC_API_KEY
Bedrock: AWS_ACCESS_KEY_ID, AWS_SECRET_ACCESS_KEY
OpenAI: OPENAI_API_KEY
⚙️ Additional Configuration
You can also configure optional Airflow MCP environment variables such as:
AIRFLOW_INSIGHTS_MODE
POST_MODE
We explain these options in detail in this blog post.
🧪 Running with Our Default Environment
If you’re using our pre-configured environment:
cp airflow-plugin-test.env airflow-plugin.envThen open airflow-plugin.env, fill in all required values, and run:
just airflow🧭 Accessing the Assistant
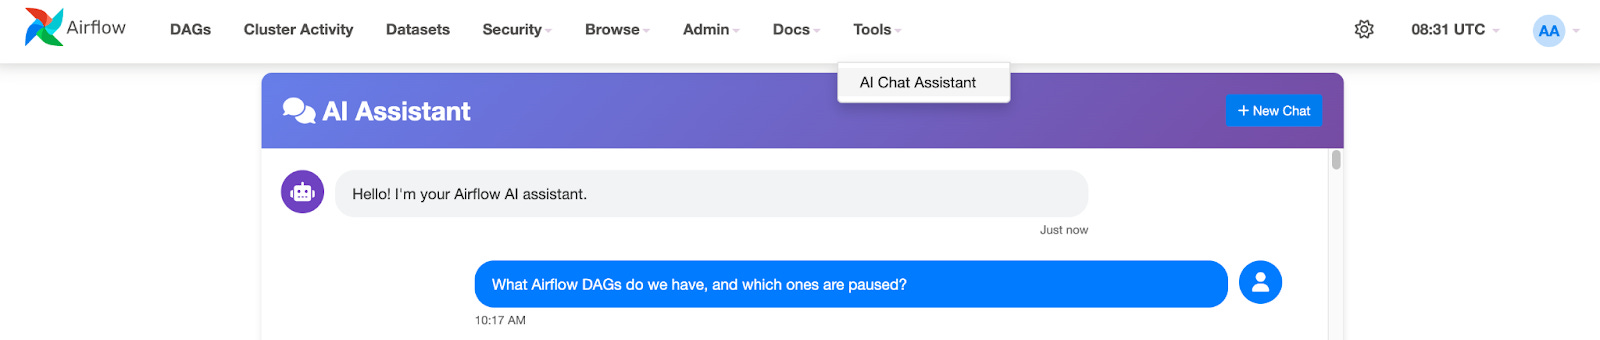
Once your cluster is running, open
http://localhost:8080, then navigate to:
Tools -> AI Chat AssistantYou’ll now see the Airflow Chat Assistant in action! Try asking:
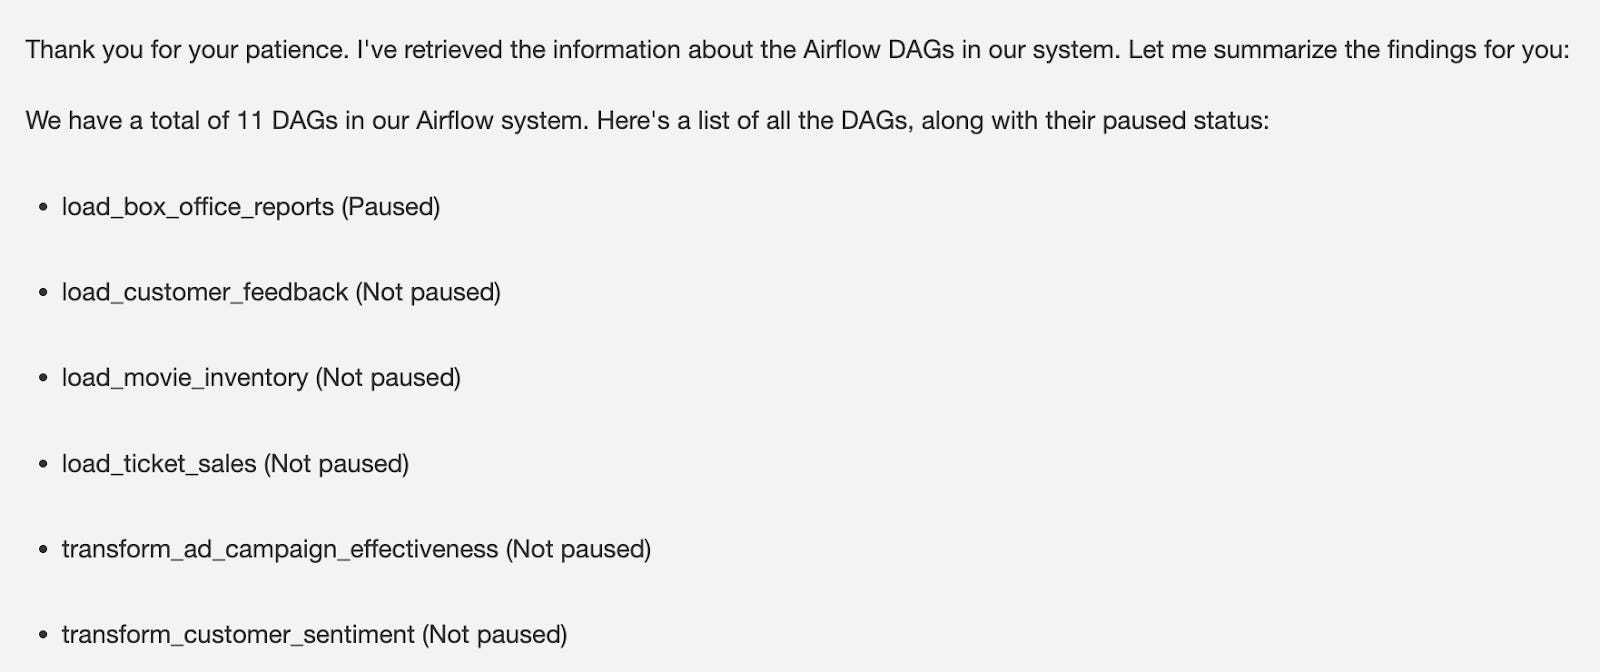
"What Airflow DAGs do we have, and which ones are paused?"
🎉 Everything should work beautifully out of the box!
🔐 Access Control
Access to the AI plugin is restricted to:
Admins, or
Any user assigned the AIRFLOW_AI role.
Other Deployment Strategies
Let’s take a look at how our simple deployment works—and then walk through how to modify it depending on your needs.
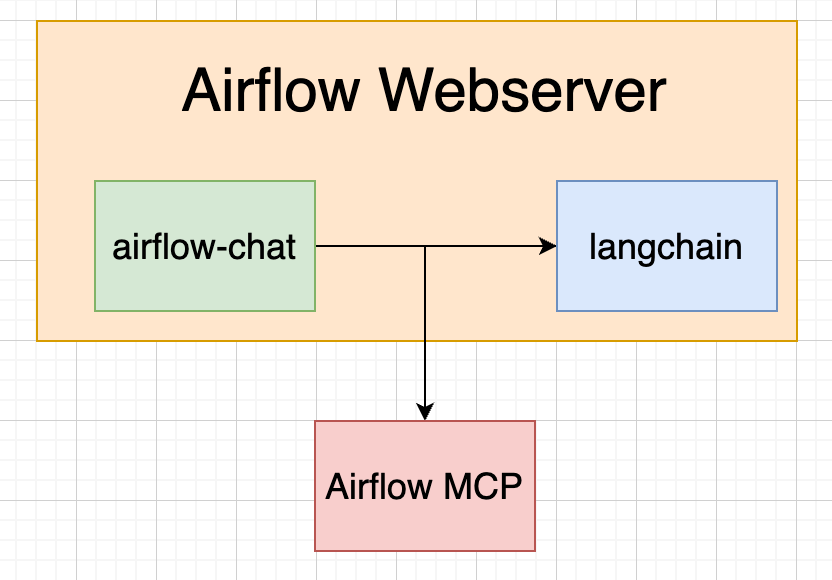
🧩 The Basic Setup
Our lightweight Airflow Chat plugin runs both the Langchain modules and Airflow MCP locally inside the Airflow Webserver. This setup works out-of-the-box with minimal configuration.
But what if you don’t want to manage environment variables inside the Airflow instance under the same user? No problem—you can split the deployment and run MCP externally.
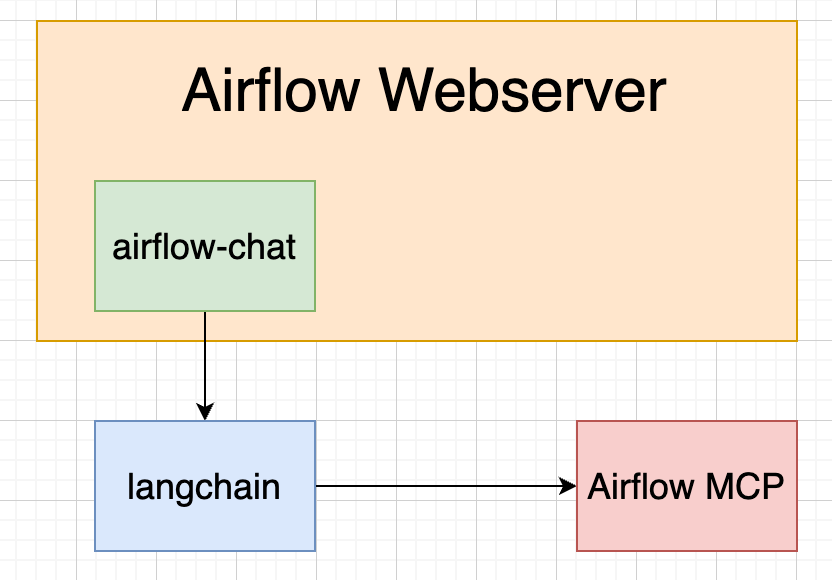
🚀 Option 1: Externalize the MCP Server
To run MCP as a separate component:
Remove the embedded MCP server from your Airflow Webserver setup.
Add these environment variables to your Airflow instance (you can use airflow-plugin.env in our repo):
TRANSPORT_TYPE=sse
mcp_host=host.docker.internal:8001
MCP_TOKEN=test_token
📌 Note: mcp_host must be updated if you're deploying the MCP server on your own infrastructure.
Remove the Airflow connection variable: AIRFLOW_ASSISTENT_AI_CONN
If you're using our repository, just run:
cp airflow-mcp-test.env airflow-mcp.envThen, customize the following variables as needed (no changes required if using the default setup in our repo):
LLM_MODEL_ID=antropic:claude-3-5-haiku-20241022
AIRFLOW_ASSISTENT_AI_CONN=airflow:airflow@http://airflow-webserver:8080
TOKEN=test_token
TRANSPORT_TYPE=sse
✅ Ensure that TOKEN and MCP_TOKEN have the same value to establish a secure connection between Airflow and the remote MCP server.
To deploy:
Run just prod if you're using our repo, or
Use the Docker image: hipposysai/airflow-mcp:latest
Refer to docker-compose.prod.yml for an example configuration.
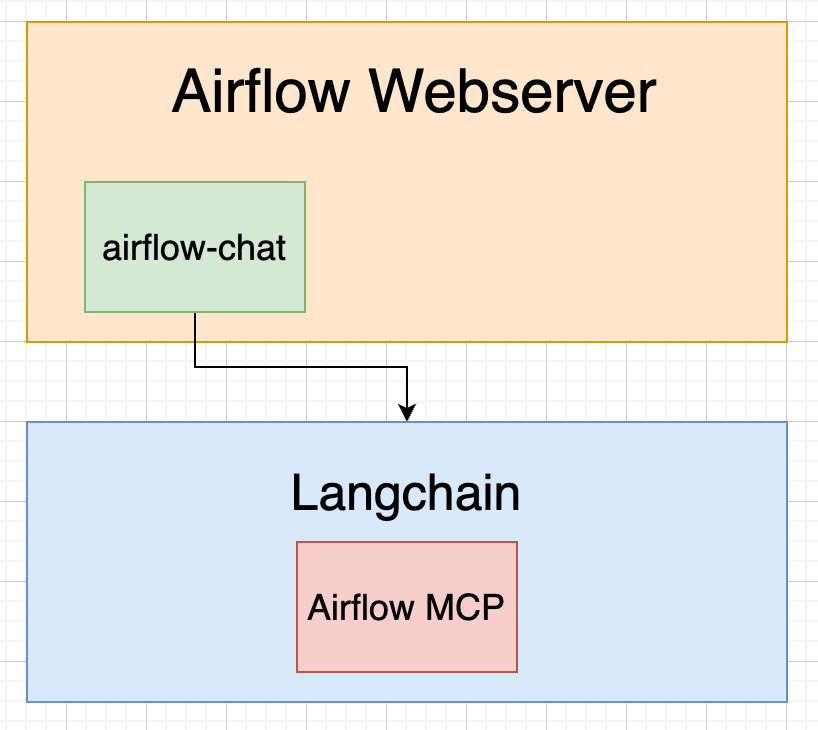
🖥️ Option 2: Use the Plugin as a UI Only (Separate Langchain Logic)
If you prefer to fully decouple Langchain logic from the Airflow Webserver (and just use the plugin as a UI layer), update your airflow-plugin.env as follows:
INTERNAL_AI_ASSISTANT_SERVER=false
FAST_API_ACCESS_SECRET_TOKEN='ThisIsATempAccessTokenForLocalEnvs.ReplaceInProd'
BACKEND_URL=http://chat_fastapi:8080
Then, for the FastAPI/Langchain service (using the hipposysai/airflow-mcp-fastapi image), define:
LLM_MODEL_ID=antropic:claude-3-5-haiku-20241022
SECRET_KEY='ThisIsATempSecretForLocalEnvs.ReplaceInProd.'
FAST_API_ACCESS_SECRET_TOKEN='ThisIsATempAccessTokenForLocalEnvs.ReplaceInProd'
TRANSPORT_TYPE=sse
MCP_TOKEN=test_token
mcp_host=mcp_sse_server:8000
POSTGRES_USER='airflow'
POSTGRES_PASSWORD='airflow'
POSTGRES_DB='postgres'
To apply this config:
cp langchain-fastapi-test.env langchain-fastapi.env
just prod
⚖️ Option 3: Separate Backend but Share MCP
Want to offload backend logic from your Airflow Webserver without introducing a separate MCP service? You can:
Remove TRANSPORT_TYPE=sse from langchain-fastapi.env (or whichever file defines your backend).
Copy all environment variables from your MCP service (airflow-mcp.env) to your backend environment.
This option gives you better performance isolation without significantly increasing deployment complexity.
Summary
The airflow-chat plugin brings a conversational AI interface directly into the Airflow UI, enabling users to inspect DAGs, query task states, and operate pipelines using natural language. Built on top of the existing MCP architecture, it offers flexible deployment options—from running entirely inside the Airflow Webserver to more decoupled setups involving external MCP and FastAPI services. The plugin supports multiple LLM backends (Anthropic, Bedrock, OpenAI), giving teams full control over model providers and data handling. With minimal configuration, customizable environment files, and built-in access controls, airflow-chat makes AI-powered orchestration both accessible and secure—right where data pipelines live.