
Trino + dbt: Simplifying ELT with Pure SQL
Manage ingestion, transformation, and testing using dbt and Trino SQL workflows


The Problem: Tracing Source-to-Model Connections
In modern data workflows, one of the hardest challenges is tracing the connection between source tables and dbt transformation models. When changes occur at the source level—such as dropping a column—errors are typically caught only at runtime when the dbt models fail. This delayed error detection increases downtime and complicates the maintenance of data pipelines.
Another challenge comes from the shift from traditional ETL (Extract, Transform, Load) to ELT (Extract, Load, Transform). Since most transformations now happen directly in the Enterprise Data Warehouse (EDW), the logic in the data ingestion layer becomes much simpler. With this simplification, data analysts and BI developers who write dbt models could potentially take on some ingestion tasks themselves—such as adding columns to existing tables—without needing to involve data engineers. However, existing tools like Airbyte, DLT Hub, or custom Python scripts for ingestion are often complicated, making it difficult for analysts to manage these tasks independently.
That’s where the combination of Trino + dbt comes in. Trino is a distributed SQL query engine responsible for connecting to various databases and enabling fast querying across multiple data sources. dbt is a command-line tool that enables analysts and engineers to transform data in their warehouse using SQL. It provides templating, materialization, and logic for building and managing transformations in a version-controlled environment.
This solution is specifically designed for companies that ingest data into their EDW in batches from other relational databases.
In this article, I explain how to implement this solution with an example I created and open sourced, which you can find here. Beyond just setting up the ingestion process, I also demonstrate how to integrate CI tests for both data ingestion logic and dbt transformation models, ensuring that any issues are caught before deployment. Additionally, I outline how to configure the setup so that data ingestion tasks and dbt models are automatically built and deployed immediately after changes are merged into production, eliminating the need to wait for scheduled pipelines to run. This approach streamlines the data workflow, enhances reliability, and significantly reduces the turnaround time for changes, enabling data analysts to manage ingestion tasks with minimal reliance on data engineers.
Exploring the GitHub Repository
Let’s imagine we’re working at a company whose Enterprise Data Warehouse (EDW) is a PostgreSQL cluster (while Postgres is not supposed to be used for analytics, it's pretty common to use it for that purpose, especially in the early stages of projects). Our goal is to ingest data from a source system running on MariaDB into this PostgreSQL-based EDW.
To get started, head over to the GitHub repository and clone it to your local machine. The only prerequisite is that Docker must be installed. Once you’ve cloned the repo, follow these simple steps:
Start the environment by running the following command: docker-compose up
Launch the relevant applications by running: source all_the_apps.sh

This script will automatically open all necessary tabs in Google Chrome for you. Here's what each tab is for:
Tab 1: DBeaver Web Interface
This is the web version of DBeaver, which we’ll use to interact with MariaDB, PostgreSQL, and Trino.
Click on Settings -> Login, and use TestTest123 as both the username and password.


Once logged in, you’ll see three connection folders on the left:

MariaDB: Connect by entering root as the username and password the password.
PostgreSQL: Connect using postgres as both the username and password.
Trino: Connect using tutorial as the username and leave the password blank.
On the right-hand side, you’ll see folders containing SQL scripts that we’ll use shortly. If you don’t see them, try clicking the "Tools" menu at the top and selecting "Show Scripts".


Tab 2: Jupyter Notebook Interface
Inside the work folder, you’ll see:
A dbt folder containing all the required dbt code for both transformation and data ingestion.
Notebooks with Python scripts that help you run the dbt projects and handle ingestion tasks.
Tab 3: dbt Docs
This tab shows the documentation for the dbt transformation project, including the imported dbt project for data ingestion.
Notice that in the lineage graph, data ingestion models are highlighted in purple, making it easy to distinguish them from regular transformation models.


Tab 4: Trino UI
In this tab, you can access the Trino UI by logging in with the username “tutorial” (leave the password blank).
Here, you’ll find metrics, metadata, and other information about the Trino query engine.


Simple Data Ingestion with dbt
Let’s return to the first tab (DBeaver Web) and open the query named “mariadb_ingestion”. Inside, you’ll find:
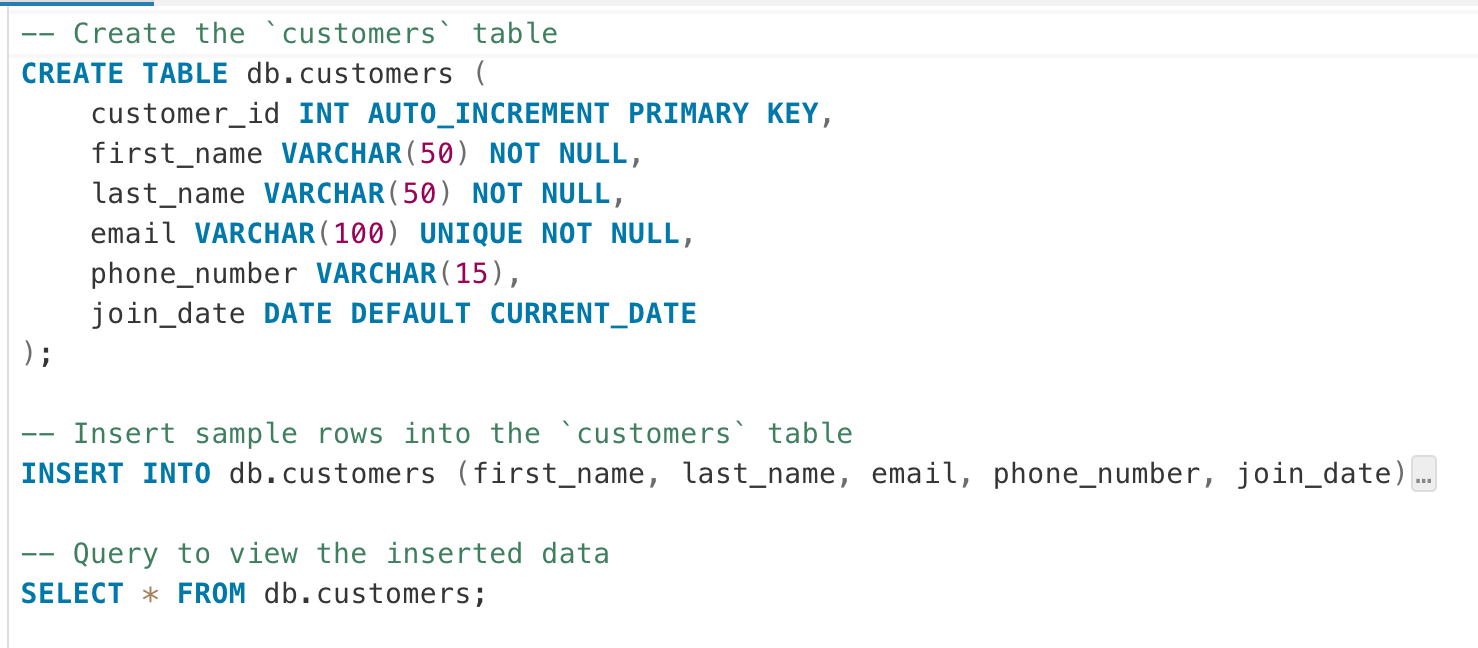
A simple DDL query for table creation.
A basic DML query to insert data into the table.
A straightforward DQL query to verify that data has been successfully inserted.
Execute each query to create the source table on the MariaDB side. Now that our source table is ready, we want to bring it into Postgres using Trino. The Trino connections have already been configured and can be found in the trino/trino_connections path in the repository.
Next, go to the Jupyter Notebook interface and navigate to the TrinoIngestionDbt project inside the dbt folder.
In the profiles.yml file, you’ll see a target configuration that connects to the local Trino instance. (Note: If using this setup in production, you’ll need to add a password for security.)

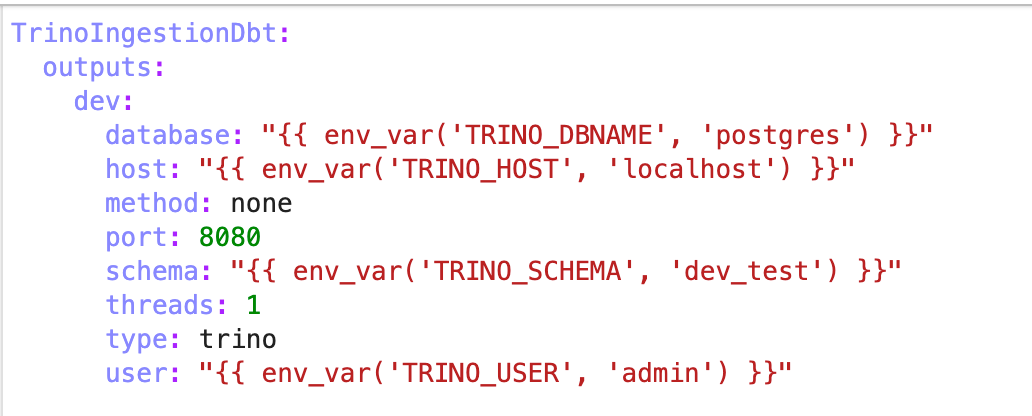
The target database is postgres, as it serves as our EDW for creating the ingestion models. We utilize the environment variables TRINO_DBNAME, TRINO_HOST, TRINO_SCHEMA, and TRINO_USER. If these variables are not set, default values will be used instead.
In dbt_project.yml, we’ve specified that all models should be materialized as tables. Additionally, we’ve set the models from this project to appear as purple in the documentation, making it easy to distinguish them from regular transformation models when imported into the main project.


Now, let’s look at the models.
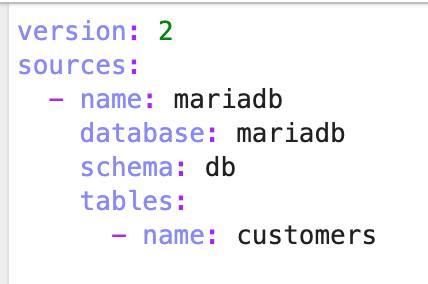
In the models folder, open sources.yml, where our source table is defined. The source points to the MariaDB catalog, the database schema, and the customers table that we just created.

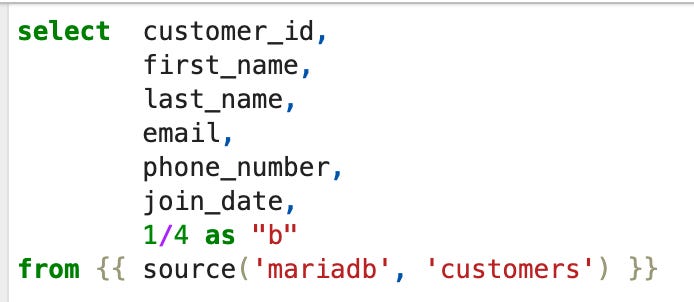
The actual ingestion model is in the data_ingestion folder. This model simply selects all columns from the MariaDB source and adds a custom column named “b”.

Next, return to the “work” folder and open the trino_ingestion_dbt notebook in the notebooks directory. At the top, you’ll find a function that constructs and executes a dbt command. This function ensures that the project directory is correctly attached and runs dbt deps beforehand to install any missing dependencies before executing the ingestion command.

Run the notebook to execute the data ingestion logic. Once it’s complete, return to DBeaver to verify the results. Open the “postgres” query file and execute the first provided DQL query. You’ll see that the data from MariaDB has been successfully ingested into the Postgres EDW.
Great! Our table is now available in DBeaver, confirming a successful data ingestion process.
Next, let’s check the Trino Web UI to review the exact queries that were executed by dbt. If no queries are visible, make sure to mark "Finished" in the State Filter, as it may be unmarked by default. The last four queries are as follows:
The first query retrieves all schemas from the database.

The second query creates the schema for our table.

The third query retrieves all existing objects and their types in the database.

Since our object didn’t exist, there was no need to drop an old object or create a temporary table. The final query simply creates the table by selecting the relevant columns from the MariaDB source table.


We didn’t have to worry about materialization, DDL, or DML operations—dbt handled everything automatically, providing a smooth and efficient ingestion workflow.
Integrating the Ingestion Project with Your Main dbt Workflow
Now, let’s move to the second dbt project, ‘dbt/PostgresDbt’. At first glance, you might think the simplest approach is to add the table we just ingested as a dbt source, create a new model, and reference that source. However, this leaves the sources and transformation models disconnected, which is one of the key problems we set out to resolve.
Instead, we’ll integrate the ingestion project by treating it as a package. Head over to ‘dbt/PostgresDbt/packages.yml’ and add the ingestion project we just created as a package. This allows us to import all its models, including the ingested table, directly into our main dbt workflow.

Keep in mind that if your EDW already uses Trino (e.g., Trino + Iceberg + AWS Glue), you can manage both ingestion and transformations within a single project—no need for two separate dbt projects.
Next, open the model: ‘maria_db_ingestion_customers.sql’. You’ll notice that instead of using source(), it references the ingested table using {{ ref('TrinoIngestionDbt', 'ingestion_customers') }}. This ensures that our ingestion and transformation steps are linked in a seamless pipeline.

Next, open the 'edw_dbt' notebook. Notice that we add --exclude TrinoIngestionDbt to the command. This ensures that dbt doesn't attempt to build models from the imported package, as Trino transformations are not supported in this case, and dbt would fail.
Run the script, and once it's completed, return to DBeaver. You should see that the table has been successfully created.
Finally, open dbt docs, where you can visualize the entire pipeline: starting from the real source table in MariaDB, followed by the ingested table (highlighted as a purple node), and ending with our transformation model. This integration brings everything together, creating a unified, end-to-end data pipeline.

Automated Testing and Building of Modified Models
Even if you stop here, you’re already leveraging some powerful capabilities with significant benefits: simplifying the ingestion pipeline, delegating ownership to other teams, and maintaining a single, unified documentation for both data ingestion and dbt transformations.
But if you’re ready to go even further, let’s walk through how you can test and build only the modified models without breaking downstream dependencies. Imagine we want to drop a column from our source and ensure it doesn’t disrupt any downstream models. For this, dbt provides a feature called defer state, which allows comparing the current state to a saved production state using a manifest file. You can read more about it here. By leveraging defer state, we can run all modified models and their downstream dependencies without affecting production data.
Since we have two dbt projects (for Trino ingestion and Postgres transformations), we’ll handle this in a specific way. For the purpose of this tutorial, I saved a production manifest file in a folder named manifest_prod in each project. I also created a notebook called run_modified, which first runs all the modified ingestion models and then runs the modified models in the main transformation project. Let’s execute it: as expected, we get “Nothing to do.” twice because there were no changes.

Now, let’s drop the column in our ingestion model and run the script again.

This time, the ingestion model is successfully built using the dev schema ci_schema_dbt_999_data_ingestion.ingestion_customers,

but the transformation table ci_schema_dbt_999.maria_db_ingestion_customers failed because it depended on the dropped column.

What happened here? First, we defined two environment variables: DBT_SCHEMA (used in the main project's profiles.yml) and TRINO_SCHEMA (used in the Trino project’s profiles.yml). These variables allow us to switch from production to a custom test schema. Next, we used two functions: run_trino_dbt_script and run_postgres_dbt_script, which handle dbt execution in the correct order—ingestion first, then transformation. The dbt command used is:
dbt build --select "state:modified"+ --defer --state manifest_prod
The flag --select "state:modified"+ runs only modified models and their downstreams, while --defer --state compares the current state to the saved production state in manifest_prod. Importantly, we didn’t use the --favor-state flag in the second function. This is because --favor-state always prioritizes production objects if they weren’t built in the current run, but we want to use objects from our custom schema whenever possible, falling back to production only if necessary. This approach ensures that ingestion models built in the custom schema are used correctly without relying on production. For more details on --defer, check the docs.
Adding to CI
Finally, we want to integrate this testing process into our CI pipeline. Navigate to the .github/workflows directory in the repository. You’ll find two workflows:

tests.yml: This workflow runs whenever a PR is opened to main, but only if files in the dbt folder are modified.
The first job, filter, checks for changes in dbt/TrinoIngestionDbt. If changes are detected, it triggers the run-on-trino-changed job.

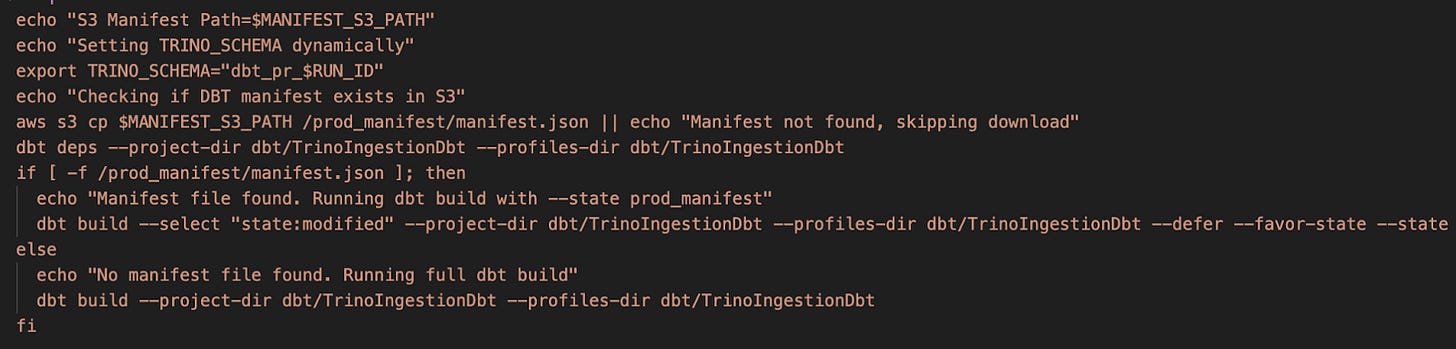
This job installs all necessary dbt packages, attempts to download the production manifest from an S3 path defined in the MANIFEST_S3_PATH secret, and sets the DBT_SCHEMA to a unique value (dbt_pr_$RUN_ID). If the manifest exists, it builds only modified models; otherwise, it builds all models.
Similarly, the run-on-postgres-changed job handles the main dbt project. Even if there are no direct changes in the dbt/PostgresDbt folder, this job always runs to catch errors, such as the one we saw earlier. Note that it uses a different manifest path since it’s a separate dbt project.


build_changed_models.yml: This workflow runs after changes are merged into main. Its purpose is to immediately build the modified models in production, so you don’t have to wait for the next job to run before seeing data updates. The logic is similar to the previous workflow, except that it uses the production schema instead of the test schema. Additionally, at the end of each job, it uploads the updated manifest file to the S3 bucket to keep dbt state in sync for future comparisons.


This approach ensures that any changes are tested thoroughly in isolation before being merged, and once merged, they are quickly reflected in production while keeping the state updated for future builds.
Conclusion: Streamlined Ingestion and Transformation with Trino + dbt
By combining Trino’s powerful query engine with dbt’s modular transformation capabilities, we’ve created an efficient, maintainable data ingestion pipeline that simplifies the end-to-end workflow. This setup not only allows data analysts to manage ingestion tasks independently but also ensures seamless integration with downstream transformation models. Through automated testing, continuous integration, and a unified pipeline, we’ve significantly reduced the risk of runtime errors and enhanced agility in handling changes. The Trino + dbt combo offers a scalable, robust solution for modern data teams. Dive into the GitHub repository here, experiment with the provided setup, and unlock new efficiencies in your data pipeline today!